本 fork ファームウェア (GOB fork) を書き込んだ後、M5Burner 等で公式ファームウェアに書き戻すと、Wi-Fi / xiaozhi 接続情報など各種設定がリセットされ、再設定が必要 になります (M5Burner の書き込みが NVS partition も上書きするため)。
書き戻し前に NVS partition (16 KB) を退避し、書き戻し後に復元することで、Wi-Fi / WSS / MQTT 等の xiaozhi 設定をそのまま引き継げます。
esptool.py必須。# 1. 公式焼く前に NVS 退避 esptool.py --port /dev/tty.usbmodemXXXX --baud 460800 read_flash 0x9000 0x4000 nvs_backup.bin # 2. M5Burner で公式 firmware を焼く (通常通り Start) # 3. NVS 復元 (自動リセット) esptool.py --port /dev/tty.usbmodemXXXX --baud 460800 write_flash 0x9000 nvs_backup.binなお、公式 → fork 方向 (
idf.py flash等での書き込み) では NVS は自動的に引き継がれます (app partition のみ書き換わり、NVS partition は触れないため)。退避/復元手順が必要なのは fork → 公式 (M5Burner 経由) のときのみです。
After flashing this fork (GOB fork) firmware, re-flashing the official firmware via M5Burner (or similar tools) wipes Wi-Fi / xiaozhi connection settings and requires re-configuration (M5Burner overwrites the NVS partition).
Dump the NVS partition (16 KB) before re-flashing and restore it afterwards. Wi-Fi / WSS / MQTT and other xiaozhi settings carry over. Requires
esptool.py.# 1. Backup NVS before flashing esptool.py --port /dev/tty.usbmodemXXXX --baud 460800 read_flash 0x9000 0x4000 nvs_backup.bin # 2. Flash the official firmware via M5Burner (normal Start) # 3. Restore NVS (auto-resets) esptool.py --port /dev/tty.usbmodemXXXX --baud 460800 write_flash 0x9000 nvs_backup.binNote that the official → fork direction (e.g.
idf.py flash) preserves NVS automatically because only the app partition is rewritten while the NVS partition is untouched. The backup/restore steps above are only needed in the fork → official direction (via M5Burner).
- Avatar.md — アバター / スキン JSON 仕様 (Avatar & skin JSON spec)
- NFC.md — NFC タグコマンド (NFC tag command reference)
Here are StackChan related open-source resources, including source code of the StackChan firmware, remote controller firmware, mobile app (iOS and Android), and server.
Update of this repo could be a little late than the released firmware and mobile app.

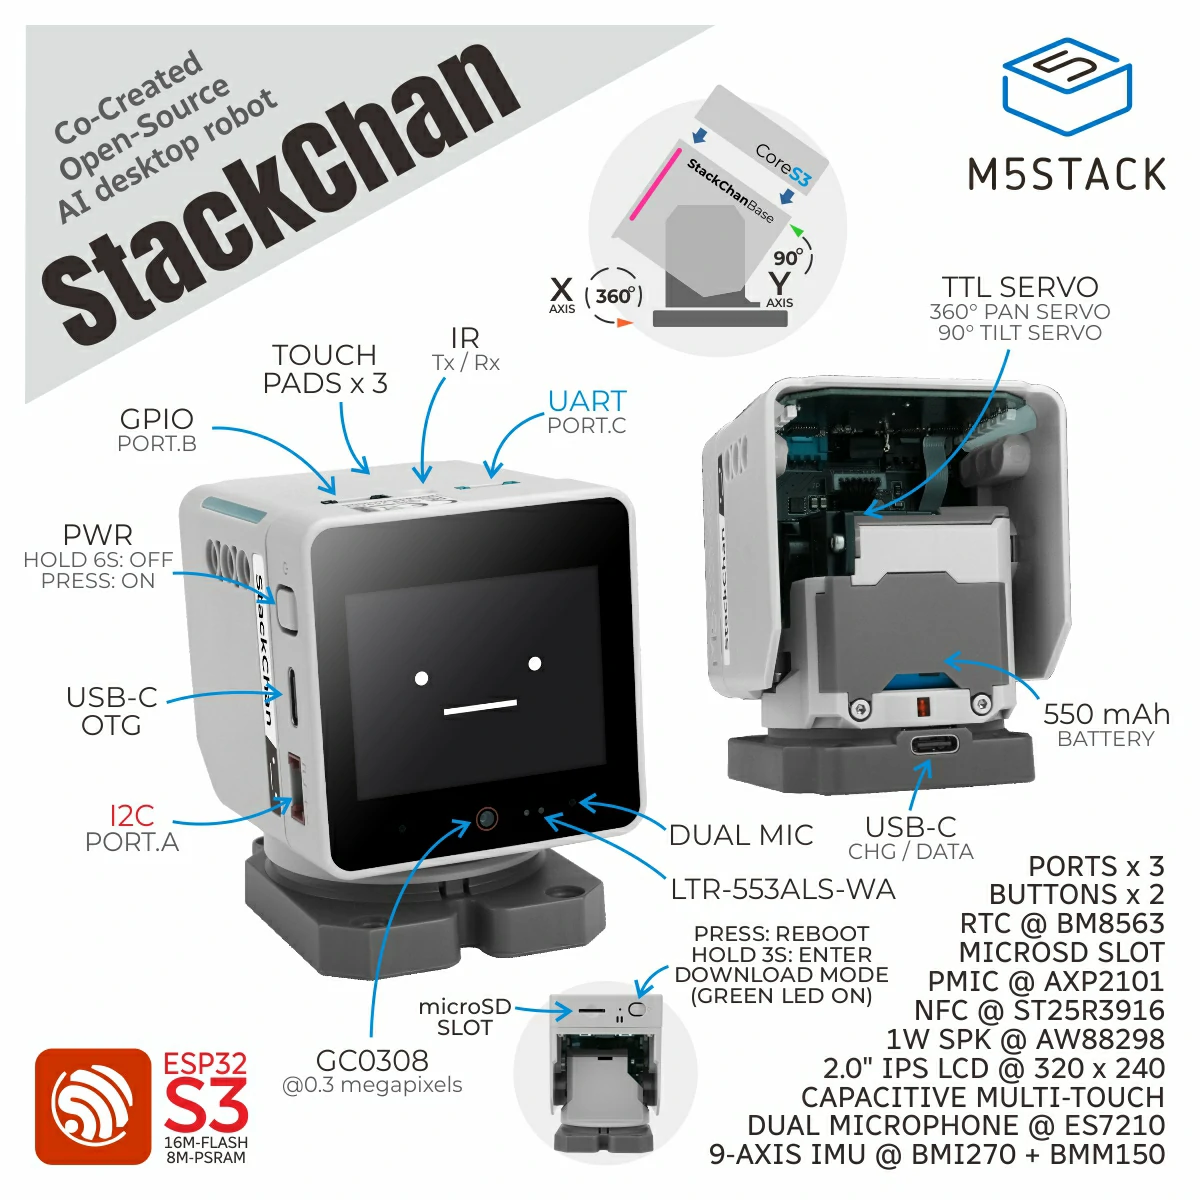
StackChan is a super kawaii AI desktop robot co-created by M5Stack and the user community. It uses the M5Stack flagship IoT development kit CoreS3 as its main controller, powered by an ESP32-S3 SoC featuring a 240 MHz dual-core processor, with 16MB Flash and 8MB PSRAM onboard, and supporting Wi-Fi and BLE. The main unit also integrates a 2.0-inch capacitive touch display with a high-strength glass cover, a 0.3 MP camera, a proximity & ambient light sensor, a 9-axis IMU (accelerometer + gyroscope + magnetometer), a microSD card slot, a 1W speaker, dual microphones, and power/reset buttons.
The robot body, connected to the main unit, includes a USB-C interface for power and data, a 550 mAh battery, two feedback servos (360-degree continuous rotation on the horizontal axis and 90-degree movement on the vertical axis), two rows totaling 12 RGB LEDs, infrared transmitter and receiver, a three-zone touch panel, and a full-featured NFC module.
The factory firmware is feature-rich, including an AI Agent, lively and expressive animations, ESP-NOW wireless remote control, and online app downloads. It can connect to a mobile app for video viewing, remote avatar control, and more, and also supports online updates (OTA). The product also supports programming via Arduino, UiFlow2, and other methods, and can connect to various expansion units in the M5Stack ecosystem, making it easy to implement a wide range of custom functions.
⚠️ Do not forcibly rotate any movable parts connected to the motors by hand when you are unsure whether the motors are powered and under control, as this may cause hardware damage.
-
Purchase link: M5Stack Official Store | 淘宝 Taobao
-
Board support package: https://github.com/m5stack/StackChan-BSP
Thank you to the contributors of the StackChan community, especially:
| @stack_chan | @mongonta555 |
| Shinya Ishikawa | Takao Akaki |