A self-hosted email tracking tool. Embed invisible 1×1 pixels in your emails and know exactly when (and how many times) they are opened.
- Generate a pixel - the server creates a unique tracking URL tied to a label of your choice.
- Embed it - paste the
<img>tag into your email's HTML body. It is invisible to the recipient. - Track opens - every time the email is opened and the image loads, the server increments the read counter and records the timestamp.
- Manage from the extension - the Chrome extension lets you create pixels, monitor their stats, and delete them directly from your browser.
EmailTracker/
├── server/                  # Node.js / Express tracking server
│   ├── server.js
│   ├── pixel.gif            # 1×1 transparent GIF served as the pixel
│   ├── .env                 # Environment variables (not committed)
│   └── .env.example         # Template to copy from
└── extension/               # Chrome extension (Manifest V3)
    ├── manifest.json
    ├── config.js            # Extension config (not committed)
    ├── config.example.js    # Template to copy from
    ├── content/
    │   └── content.js       # Content script injected into ProtonMail and Gmail composers
    └── popup/
        ├── popup.html
        ├── popup.css
        └── popup.js
- Node.js 18+
cd server
npm install
Copy .env.example to .env and fill in your values:
cp .env.example .envAPI_KEY=your-secret-api-key
SERVER_DOMAIN=https://your-domain.comnpm start
# Listening on http://localhost:3000All admin routes require the header X-API-Key: <your key>.
| Method | Route | Auth | Description |
|---|---|---|---|
GET |
/pixel/:id |
No | Serve the tracking pixel (records a read) |
GET |
/pixels |
Yes | List all pixels with their stats |
POST |
/pixels |
Yes | Create a new pixel { "label": "..." } |
DELETE |
/pixels/:id |
Yes | Delete a pixel |
Create a pixel - example response:
{
  "id": "550e8400-e29b-41d4-a716-446655440000",
  "url": "https://your-domain.com/pixel/550e8400-e29b-41d4-a716-446655440000"
}
Pixel object:
{
  "id": "550e8400-e29b-41d4-a716-446655440000",
  "label": "Invoice email - John",
  "created_at": "2026-04-16T10:00:00.000Z",
  "read_count": 3,
  "last_read_at": "2026-04-16T14:32:11.000Z"
}- Rate limiting: 200 req / 15 min globally, 30 req / 15 min on the public pixel route.
- HTTP security headers via Helmet.
- Request body capped at 10 KB.
- Admin routes protected by API key.
Copy config.example.js to config.js and fill in your values:
cp config.example.js config.jsconst CONFIG = {
API_URL: 'https://your-domain.com',
API_KEY: 'your-secret-api-key'
};- Open
chrome://extensionsin Chrome. - Enable Developer mode (top right).
- Click Load unpacked and select the
extension/folder.
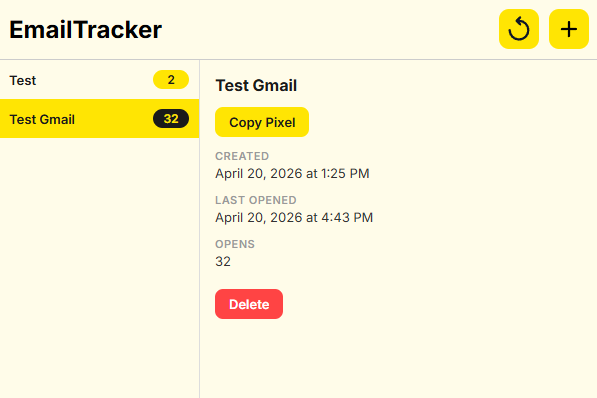
Click the EmailTracker icon in your toolbar to open the popup.
- Create - enter a label and generate a new tracking pixel. The embed URL is ready to paste into your email.
- View - see all your pixels: label, creation date, open count, and last open time.
- Delete - remove a pixel you no longer need.
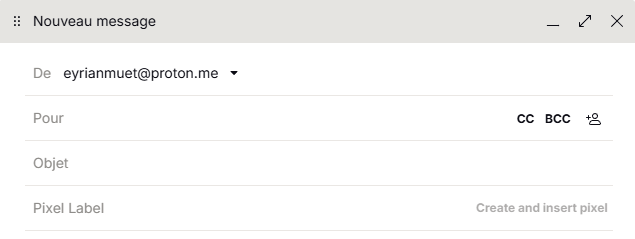
When composing an email on mail.proton.me or mail.google.com, a Pixel Label input and a Create and insert pixel button are automatically injected into the composer header. Fill in the label and click the button - the pixel is created on the server and inserted invisibly at the end of the email body in one click.
Button injected into the ProtonMail composer

Button injected into the Gmail composer
The extension communicates with your self-hosted server using the same API key configured in
.env.
ProtonMail proxies all remote images through its own servers and requires HTTPS. If your server only exposes HTTP, images will not load for ProtonMail recipients (even when they allow remote content).
Even for other recipients, serving the pixel over HTTPS is strongly recommended: some email clients and security gateways block or silently drop HTTP images depending on their privacy settings, regardless of whether the sender uses ProtonMail or Gmail.
To support ProtonMail tracking you must serve the pixel over HTTPS. If you have a domain, the recommended setup is a TLS certificate managed by Let's Encrypt / certbot behind an Nginx reverse proxy.
If you do not have a domain or certificate, you can expose your local server through an SSH tunnel service such as Serveo, which gives you an HTTPS URL with no installation required:
autossh -M 0 -o "ServerAliveInterval 30" -o "ServerAliveCountMax 3" -R some-subdomain:80:localhost:3000 serveo.net
# Forwarding HTTP traffic from https://some-subdomain.serveo.net
autossh keeps the SSH tunnel open, preventing Serveo from shutting it down after a period of inactivity.
Set SERVER_DOMAIN in your .env (and API_URL in the extension config) to the HTTPS URL provided by the tunnel.
MIT